September 29, 2012

DIY- Garbage Disposer Cleaner

This post is gonna be short & sweet.  Because I have 19 minutes until I have to leave for work.  Then off camping & to enjoy the great outdoors & the 80 degree weather to usher us into October!

I found these babies on pinterest...of course...and had to try them out because they are super easy & fast.  They are garbage disposer cleaners!  2 (TWO!) ingredients- a lemon & some vinegar! I can do this!

Our garbage disposal starts smelling after awhile & I never REALLY knew what to do to clean it- typically I'd just dump a little bleach down there and flush it through for awhile.  It did get rid of the smell!  And since our disposal broke once & the repairman suggested shoving some ice cubes down there every so often, this recipe makes sense!

I added a little "something" in mine- here's the steps:

1. Cut up some lemon!

2. Squirt a little Dawn on the bottom of an ice cube tray

3. Place a lemon chunk in each ice cube spot

4. Fill with vinegar

5. Freeze!!!

6. Pop out & store in ziploc bags (unless you like the smell of vinegar in the freezer....)

7. To use: drop into garbage disposal & let that do the work for you!

I added some Dawn to the bottom


 I added the Dawn cuz it made the ice cubes pop out of the tray easier once frozen...plus what can a squirt really hurt?  PLUS after I popped the cubes out you can stick the tray in some water & it will soap up & start the cleaning process for you :)

AND I actually only cut up half the lemon then squeezed the juice from the other half over the tray to add a little extra lemon scent.  They work wonderously & I could def smell some lemon scent as I sent the cubes down the disposal.

September 27, 2012

Baked Philly Chimis

This post has been a few days in the making.  I literally clicked "new post" 3 or 4 times, even left the post up thinking I'd get to it.  But you know me, I get distracted easily. Pinterest, facebook, tv...oh  my!  And a thing called work.

When was my last day off? Friday.  Last Friday, Curt and I both were scrolling through pinterest to find something to make for dinner- and I had suggested a Philly Cheesesteak Stuffed Peppers recipe I pinned awhile back.  Then he found something else philly cheesesteak, then he was like...what if we made them wraps? Like baked burritos or chimichangas or something? ding ding ding....winner winner chicken dinner (as Guy Fieri would say).  So I present to you...

Baked Philly Chimichangas

Ingredients:
-large tortilla shells
-1 box Steakums (one of Curt's faves-find in the freezer section)
-1 onion (we used yellow...my fave)
-1 green pepper
-Sliced provolone cheese (or cheese of your choice)
-any other toppings & seasonings you'd like!

Directions:
-Preheat oven to 350 degrees
-Saute peppers & onions in a pan with some seasonings- Curt used pepper, garlic, & cayenne pepper
-Cut Steak-ums in strips
-Remove from pan, cook Steak-ums according to box
-Put Steak-ums, peppers & onions, & a couple cheese slices on a tortilla shell, & roll into a chimichanga
-Spray top of chimichanga with cooking spray (or melted butter), layer cheese slices on top
-Bake until cheese is melted & chimi is lightly browned
       (may broil for the last minute or two to really make it look yummy)
-DIG IN!

peppers & onions

Curt cut the steak-ums into strips

you can see the glisten from the oil/spray, layer cheese on top

Curt added shred cheese & tomatoes on top

post baking/broil

The inside yumminess

Curt's deluxe philly
When debating whether to really call these "chimichangas" or not, I decided to look up the definition of chimichanga.  Yes, this definition is from wikipedia, but according to a story of the origin, the word "chimichanga" loosely translates to "thingamajig" is Spanish.  So Baked Philly Thingamajigs it is :)

September 21, 2012

Badger Bottom Cupcakes!

A day off! And a Friday at that! It is gorgeous out...sunny, breezy, 72- couldn't ask for more! Jethro & I went for a walk, did "fall cleaning", and baked! yes those last two were done indoors- but with all the windows open!!!  Have to enjoy this last day of summer & last day of freedom before my next four-day stint in the pharmacy.

Plus, if the techs have to put up with me the next four days, I gotta bring something in to bribe them! You would think with pinterest I'd always have a hundred things I want to bake, and if not....I have some of my mom's recipes, and cook books, and more classic cookbooks I was willed by my great-grandma, grandma, & aunt on my mom's side.  I had been craving cupcakes, but nothing seemed "right".  Yet the instant I found a recipe on pinterest for Red Velvet Puppy Chow (yes!), I had an idea!

Why not combine one of my mom's favorite cupcake recipe with one of my favorite cupcakes?!?! Hers= Moon Surprise Cupcakes- or known to most as "Black Bottom Cupcakes". Mine= Red Velvet Cupcakes. Because Red Velvet is typically paired with cream cheese frosting.....anddd Black Bottom Cupcakes have cream cheese filling!!! Perfect match!  But what to call them, what to call them?  I felt "Red Bottom Cupcakes" elicited images of diaper rash. (Imaginative mind, huh?) But, it's almost Saturday aka college football time! And my team=Wisconsin Badgers- who are red, so "Badger Bottom Cupcakes" it is :)

Badger Bottom Cupcakes
(the easy way)

Ingredients- 
1 box Red Velvet cake mix- & ingredients to prepare per box
       (I used Betty Crocker- & you need 1 1/4 c water, 1/2 c veg oil & 3 eggs)
-1 (8oz) box cream cheese, softened (I used Neufchatel cheese, 1/3 less fat!)
-1/3 cup sugar
-1 egg
-1/8 tsp salt
-1 c chocolate chips

Directions-
-Preheat oven according to box (325-350 degrees typically)
-Line cupcake pan with liners (makes 24 cupcakes)
-Mix up cake mix per box
-Fill cupcake liners 2/3 full with red velvet cake batter
-In a small bowl, beat cream cheese
-Add sugar, egg, & sprinkle of salt & blend; stir in chocolate chips
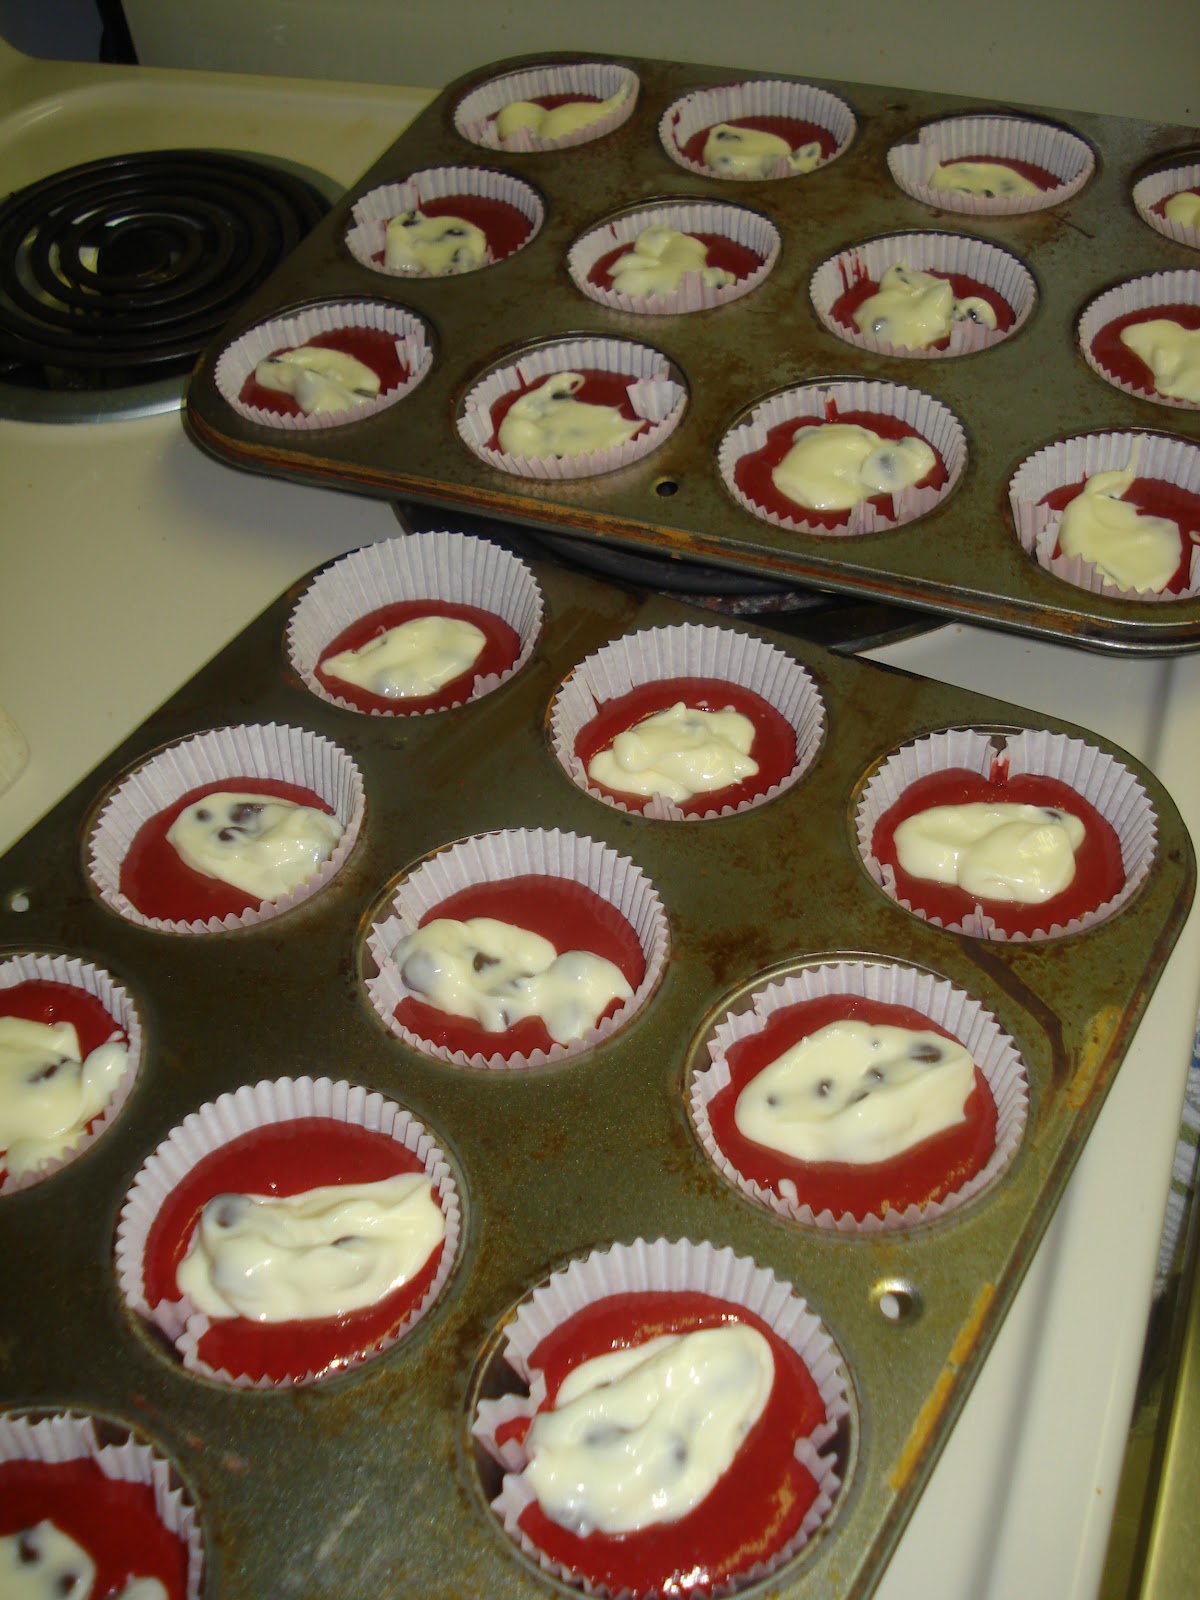
-Using a spoon, drop a dollop of the cream cheese mixture in the center of      each cupcake
-Bake according to box- 18-22 minutes-ish (mine took 18 minutes)
-Cool, enjoy, & frost if you must!

Basically all you need! + ingredients for the box mix

Cream cheese mix....add in the chips!

You can tell how much care I take in adding the dollop of cream cheese!

all ready to bake!

mmm...I naturally break open one w/ little filling....but still tastes delish!

Badger Bottom Cupcakes! Go Wisco!
mmm. even if you're not a Wisconsin fan...guarantee if you like Red Velvet, you'll like these! Make them more homemade with an actual Red Velvet cupcake recipe, or add on a little cream cheese (or chocolate) frosting on top to really complete the look.  And if you can brainstorm a better name, feel free to rename them what you want :)  Happy weekend to all!

September 17, 2012

A 2013 Wedding....

Planning a wedding is fun.  No really, I can attest.  Ask Curt, I think/obsess/pinterest wedding at least once daily.  One thing I recently started thinking about was what the weather will be like next year.

I can thank the local news for that- they started discussing the good ol' Farmer's Almanac & how now that winter is approaching, people are snatching up the almanac to read about what type of weather we are in for this coming year.  With this past winter being so mild, people are curious as to what this winter will be like.  And with an April wedding in Wisconsin, I am curious as to what Mother Nature has in store for our big weekend- snow? 85 & sun? you never know.

And honestly, I wanted to just flip through the almanac and reminisce.  The first time I ever read one was at my great-grandma Wriedt's house years ago.  Sitting in her living room, the smell of her perfume soaked in to her pink sofa (among other scents...), looking out at the golf course in her back yard, and looking at the weather to see how many snow days we were in store for the coming year.  Ahhhh to be a kid again.

Sorry, I digress.  So the other day, when I went grocery shopping, I stopped by the magazines & picked up a Farmers Almanac.  I got home, and saw that April 27th was not listed in the "Best days...to get married"section.  So I flipped to the weather predictions- "Zone 2, Great Lakes & Midwest, 24th-27th- "very unsettled times". What does that mean!?!?!?  I'm hoping it's just due to the full moon on the 25th.


But I wanted to share what the Farmer's Almanac lists as "Best Days to...Get Married" for all those planning weddings or with superstitions.


It's kind of fun to look at!

And just as a general FYI, I wanted to provide a list of major holidays of 2013....also good to know when planning a wedding.  So  many things to consider!


September 14, 2012

Rainbow Cake Bars

I like...correction love...to bake.  I think it comes from my mom, who is notorious for bringing in a treat almost every night she works.  And factor in my love to eat...yup, makes sense.

But, I'm lazy.  Which, I know I shouldn't be with all I eat, but after a long day at work I'm not too motivated to go run some laps around the block.  Perhaps as the wedding draws closer, I'll think about getting my act together. 

When it comes to baking & cooking, I'm also lazy.  Looking at recipes online, especially the pictures thanks to pinterest, can be deceiving.  You see this fabulous looking cookie or bar, and you think, this can't be too bad to make.  Someone comments on how delish it is, and your mouth starts watering.  Then you click on the link to the recipe, and with one glance, I can tell if I'm going to attempt it or not.  If there are more than like 12 ingredients on the list, it's a pass.

Once I start baking, I get on a roll. I just get lazy when it comes to the clean-up (ask my mom or Curt).  So any recipe that has few ingredients...and uses only a few bowls/spoons/pans gets me excited. Such as this one from pinterest- Lazy Cake Cookies.  Looking at the recipe, I could have mixed in & got it in the oven in less than 10 minutes.  But I decided to upgrade it a little.  I present to you...

Rainbow Cake Bars

Ingredients:
-1 box of cake mix- I used yellow for taste, but for coloring purposes, white would work best.
-2 eggs, beaten
-5 tbsp melted butter
-1 tbsp water
-2 c mini M & Ms
-food coloring of your choice
-Sprinkles

Directions:
Preheat oven to 350 degrees.  In a bowl, beat the 2 eggs, then add in the cake mix & butter and continue mixing.  It's pretty thick- so add in the water to thin it a little.  Stir in the M&Ms. Separate dough for coloring- I used 2 additional bowls, and added red & blue dye to the mix.  Once your satisfied with your coloring, drop dough into a greased 13x9 pan.  Once all the dough is in, pat down evenly in pan (I sprayed my hands with a little cooking spray), then sprinkle with rainbow jimmies or decor of your choice.  Bake for 20 minutes.  Enjoy!

colored dough w/ M&Ms

The dough dropped in the pan

patted down, added sprinkles

YUM. The smell & taste is delicious!
How could you not see these & be happy?! And want to eat like 12 of them?!  I have limited myself to 2 so far....but am about to eat lunch & will probably need dessert.

September 12, 2012

Engagement Pics!

Planning a wedding is expensive (as many of you know)! So many things to fork money out for- food, music, pictures, newspaper announcements, stationery, transportation, favors, dresses, tuxes, decor...the list goes on.  So there are plenty of ways to save money- but it's SO HARD to budget & decide where to splurge & where to skimp.  And I think no matter how much planning, something ALWAYS happens where you have to fork out a little more than you had budgeted or wanted.

One way we decided to save a few bucks is have my mom take some engagement pics for us with her nice camera.  She kept offering, so when we met up for our annual family vacation to Wisconsin Dells, we planned to take some pictures.  I had really been hoping to get our save the dates finished & mailed out over our vacation too- but I needed a picture first!

The first set of pictures were taken while camping at Mirror Lake State Park in Baraboo, WI


I was pouting because Curt didn't want to pose in any fun ways!!!!!


Love this picture w/ our little Jethro!
So the poses aren't the most original, I didn't have internet access to quick pull up poses I had pinned on pinterest.  But the pictures didn't turn out too terrible.  It helped I used Google+ images to edit them- it features some of the editing that Picnik provided.  (follow the link to see the details on their closure & how to use some of their software in google+)

Those pics were good and all, but to create our save the dates (which will be featured in a blog post soon) we needed to showcase our love for football & our "divided house". So when we traveled north to my parents house, we went around our yard taking more pictures.


Just had to use a different effect from the old Picnik features!


Those aren't all the attempts (believe me....luckily Curt was a trooper throughout though), but you get the picture (haha).  Thank you to my mom for taking pictures for us too!

September 4, 2012

Nut Allergy Knowledge

As you may or may not know, Curt is blessed with an allergy to peanuts & all tree nuts- how fun right! He's had these since childhood, so he has never known the goodness of Butter Pecan ice cream or turtle sundaes (the one thing I miss most about having a nut-free house- the ice cream w/ nuts/nut products).  But thankfully, as the years go on, it's getting easier to live with nut allergies- grocery shopping, baking, even going out to eat!  So here are some tips and information I have gathered that we have utilized many a time when doing the cooking, baking, & eating we so love to do!

A great website Curt found: AllergyEats , which is actually a great website for anyone with food allergies- select which allergies you have at the top of the homepage, and type in your location & search.  Other allergy-ridden people have rated restaurants in your town as to how their experience was with the restaurant & how "safe" their experience was.  There are also great tips, resources, and they have an app! (for those in the 21st century unlike myself)

    If you're at a restaurant you've never been to before, we recommend looking at their website ahead of time, or even calling the restaurant before your visit to save some worry. Make sure to scout the menu for any signs of nuts- like almonds in their salads, or peanut butter on their burgers- you make think you're safe avoiding these items- but there could be cross-contamination!!!!  A knife used to cut a peanut butter burger, then used to cut your burger...could cause a reaction!  Check cooking oils-and not just those used for frying, but the cooking spray they use as well- their non-stick spray may in fact be peanut oil!

You may think a peanut allergy means the end of peanut butter. Well, alas! it's not! technically speaking that is.  There are great substitutes that taste like peanut butter- and look exactly like peanut butter to Curt's demise.  Check out Soy Nut Butter, which I personally use & enjoy- it's peanut free, tree-nut free, gluten-free, dairy-free and manufactured in a facility that does NOT manufacture anything with nuts- so it's 100% safe!  Helllllooo pb & jelly sandwiches & scotcheroos & peanut butter kiss cookies :)  I paid roughly $4 for a jar, so it's not terribly more than real peanut butter.  Also check out SunButter- "peanut" butter made out of sunflower seeds! I have yet to taste-test, but I've heard good things!  SunButter is more readily available in your local grocery stores.

  Many people with allergies get the pleasure of carrying around EpiPens, just in case.  When you go to your pharmacy to pick up your prescription, yes, we realize you don't use them that often & want them to last as long as possible, so why are we giving you pens that expire in October 2013?  The pharmacy has little say in when the drug expires when we order them for you, plus EpiPens simply aren't stable forever.  If you don't know much about EpiPens, check out their website for directions, information, and even a free TSA card in case you need to fly with these!  Honestly, it's great for everyone to know how to use an EpiPen, allergy or not, in case you have to help someone who is having an allergic reaction!
          ps- carrying benadryl is a fantastic idea too! In the case of anaphylaxis, epipens work a ton faster, but benadryl can start kicking in in 15-30 minutes....so it can be beneficial to take & help with reactions & hives!

  A great blog I came across awhile back too is The Nut-Free Mom, who shares a TON more information and a ton of great recipes that are completely nut-free.  I honestly need to read through it for recipe ideas more often!

If you're looking for more information on food allergies in general, head to The Food Allergy & Anaphylaxis Network website, which has lots of education, events, news, & tips.

  And if anyone is looking to bring us a pack of cookies or snacks because you know we love to eat & I love free things & presents- please don't bring us anything that contains ANY peanuts, walnuts, almonds, peanut oil, cashews, etc.  Nor can it "be processed on equipment that also processes peanuts", or "may contain traces of pecans".  But thanks for thinking of us :)

Hope you learned something...and as we travel more & travel to countries where English is not the first language, we will be able to share more tips & tricks with you all.  Good night!